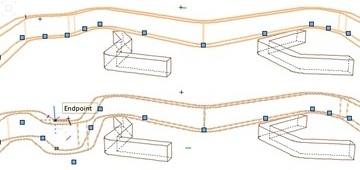
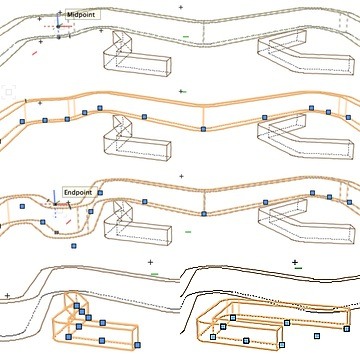
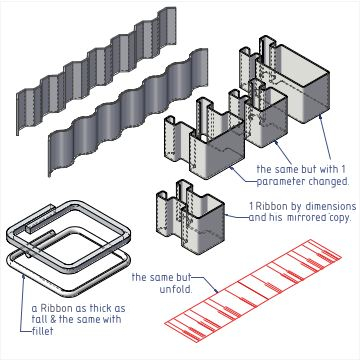
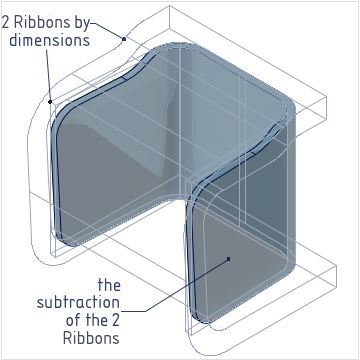
Ribbon tools

  • Stacks Image 749
  • Stacks Image 752
  • Stacks Image 755
  • Label
  • Stacks Image 856
  • Stacks Image 858

Ribbon_dimension2 The Ribbon by dimensions plugin and
Ribbon_by_points the Ribbon by path plugin draws both closed double-line polygons, each on a different way for different applications. It is similar to the double-line polygon tool but it draws directly closed double-line ,with radius corner if wanted.

  • Their geometry can be modified like a simple polygon and still have a closed double parallel line (a Ribbon) with a very clean geometry . This is important when you are working in 3d.
  • You can have radius vertices.
  • Radius, thickness are just parameters and can be modified at any time.
  • Add or delete vertices.
  • Set them as extruded solid that works like an extrude. You can have holes in it or add two of them etc.... You will always be able to edit the strip at a later point.
  • You can view the unfolded surface (at the middle axis).

Ribbon_dimension2 The Ribbon by dimensions:
A plugin point object. You define the geometry by setting the number of segments, their length and the angle relative to the previous segment. You also set which segment and which part of the segment is the reference (the insertion point). This reference stays fixed when you change parameters. This is not the most intuitive approach but it' s the one you need when you want something precise or to be able to modify by values.
Ribbon_by_points The Ribbon by path:
A plugin path object. You draw as with normal polygons, modify it like a polygon by moving a vertex, a group of vertices, manually or by editing the coordinates. Then you have the other settings (radius, thickness...).

how to...

How to use the Ribbon by dimensions ...
How to use the Ribbon by path .........

Ribbon by dimensions:

Most of the parameters are hidden when they are not used.

  1. Thickness: The thickness of the Ribbon (without limit).

  2. Radius: Here you set an inner radius and its dimension. If the required radius is not possible (segments too small , angle too acute) the radius will be set to the maximum and the opposite one altered to this new dimension (-+ thickness). The infos field will show which vertex has a smaller radius. If all radiuses have the right dimension, OK will be shown.
  3. Number of segments: You can have up to 9 segments. If you need more, you have to make two or more parts. If you need symmetrical parts, it is much easier to make one part and to mirror it. (You can add the part if they have been extruded).
  4. Origin: Like a double line or a wall, left, centered or right from the line you define. The 'From segment '& the 'Origin X' menus will set which part will be the reference, also the insertion point wich stay fixed when you change other parameters.

  1. Dimensions: The dimension of the segments that make the ribbon and their relative angle to each other. These fields appear or disappear when you set the number of segments. It can be a bit difficult to find the right one but I have the option to have the values appear on the drawing (see below)
  2. Extruded: If setting to extruded, you will be able to set the height of the extrude and the distance of the start of the extrude (bot Z if on the Z axis) and from which axis it needs to be extruded.
  3. Show values: This writes the length of each segment at the centre of it and the angle on each vertex. You can set the text size. This option is only enabled when not extruded. If you need both, make the 2D one with value, set his plan to layer plan (in the right view), duplicate it & set the extruded option.
  4. Lenght on middle axis: This will tell you the material required to build it.
  5. Unfold: This will draw (and only draw, so make a duplicate if you need both) the unfolded strip. The height of this is the height of the extrude even if not set.

Stacks Image 916
Stacks Image 863
Label
Stacks Image 879

Ribbon by path:

The Ribbon by path can have up to 40 segments (if you draw more segments they will be discarded).
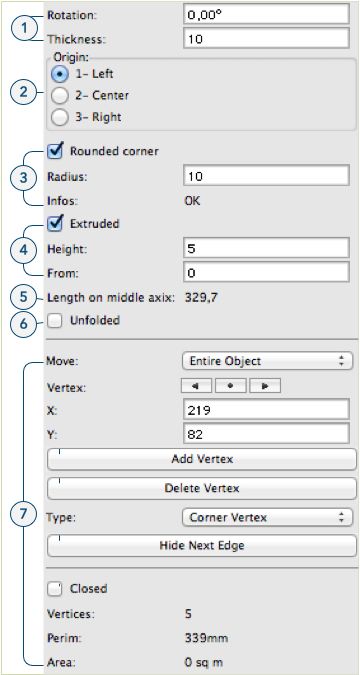
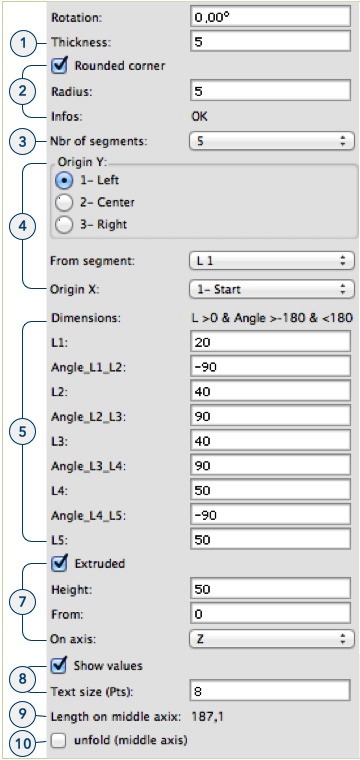
Some parameters are hidden when they are not used.

  1. Thickness: The thickness of the ribbon.
  2. Origin: Such as double-line or a wall, left, centered or right from the line you draw (the path).
  3. Radius: Here you set if you want radius corners and their dimensions (inner radius). If the required radius is not possible (segments too small, angle too acute ) the radius will be set to the maximum and the opposite one will be altered according to this new dimension (-+ thickness). The infos field will show which vertex has a smaller radius.If all radiuses have the right dimension,OK will be shown there.

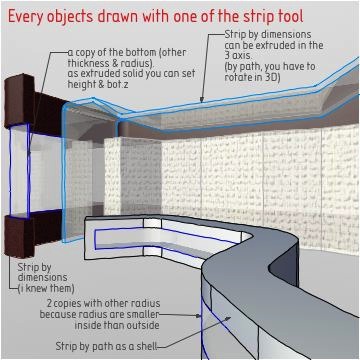
  1. Extruded: When you set to extruded, you will be able to set the height of the extrude and the distance of the start of the extrude (bot Z).
  2. Lenght on middle axis: This will tell you the material quantities required to build it.
  3. Unfold: This will draw (and only draw, so make a duplicate if you need both) the unfolded strip. The height of this is the height of the extrude even if not set.

  4. polygon edit panel: The normal polygon/polyline edit field to edit the path by coordinate.

Stacks Image 902
Stacks Image 929